Showing posts with label DIY. Show all posts

Tuesday, January 28, 2014

Inspiration Tuesday!

Hello friends!


Big news in the Gantz house.... We have FINALLY decided on a style/design for our kitchen and master bathroom renovations. Gotcha. Now, you may not think this is big news, but to us it is! We have been debating about these renovations for a couple months now, not being able to pull the trigger. I think now that we have a very clear vision of what we want... the magic can begin!


I want to share a few of my "inspiration" photos for both spaces. Our house has a definite style to it that I like to call "Modern Farmhouse."  I am slightly obsessed with antiques and things of that nature, but at the same time, love straight lines and geometric patterns. Trying to find the balance between these two seemed to be a challenge at the beginning, but I think I have achieved this in our dining room and living room. Now.. I am the one that thinks this and am no expert in any shape or form. Other's may have a different opinion, but they don't live here, therefore, it doesn't matter!

Let's talk kitchen!

Right now our kitchen has a very funky layout that drives me crazy. Here's a photo of what we are currently working with:


This was before we randomly decided to start demo-ing the floral board. Sorry Gabe!

This picture above is looking in through the dining room. Here's another view:


This is looking from the sink- we took a door off to see if we could strip the varnish and paint the doors. Holy work.

Now here are the pro's of my current kitchen:
  • Space. I have ample space to work with in designing the new one.
  • Cabinets. Even though I can't use all the cabinets because of the weird layout, I have space for a lot of things.
  • Window. The window over sink lets in so much gorgeous light and looks out into the back yard.
Let's talk con's:
  • LAYOUT. There is not a great working triangle for this chef-wannabe. 
  • Floral board. Whoever invented that plastic floral board covering the walls is not a friend of mine. 
  • Counter tops. Outdated. 
  • Cabinets. Outdated. 
  • Storage. While I have a lot of cabinets, there is no pantry or broom closet.
There are good things and bad things about the kitchen and it helped when we first decided to renovate this space to list them out. It has led the new design.

Here is my inspiration picture:


The things I love most about this kitchen are as follows:
  • Cabinet colors.
  • Pops of bright colors (ours will be mint obviously)
  • Those adorable "EAT" pallet letters
  • Type of floor (wood ceramic tile)
  • Rectangle back splash (ours will be a glass tile)
Up next.. We have to figure out how much work we want and have time to do ourselves, what we need to have a professional do, and how much we want to spend. Kitchen and bathrooms add up very quickly and we don't want to have to sell a kidney to pay for it. Can't wait to show you updates of this project! 

On to, the bathroom.

Our master bathroom is terrible. I mean carpet, laundry facilities, original vanity terrible. See below:


This was when we first moved in. We do have a dryer and adorable laundry hampers from TJMaxx in there currently. But I mean honestly.. Why do people put carpet in bathrooms? I will never have an answer to this question. When we bought our house we new it needed renovating which was one of the reasons we purchased it, we wanted to make it our own! Here are the inspiration pictures for the new bathroom:


Here is what I love about the above pictures:
  • SUBWAY TILE. It comes in so many different colors but we are going with good ole' white with a dark grey grout. Very classic. 
  • Wood floors. We are once again doing the wood ceramic tile in the bathroom. 
  • Re-purposed vanity. I am on the hunt for an antique vanity that can be re-purposed into a vanity with sink. 
  • Modern farmhouse feel. See above. 

Gabe and I are off to pick out tile tonight and can't wait to show you what we decide on! I will most definitely keep you all updated of this ginormous project we are undertaking. Wish us luck!

Have a happy and blessed day all!

Xo- Karalie 

Thursday, January 23, 2014

Flea Market Fun

Hello friends!


We have started on some new projects in our house and thought I would share the before pictures with you!

I have been looking for a dresser to "re-do" into an entertainment stand for awhile now, and guess what... I finally found one! The lucky winner was at Boyle's Joyland in Topeka! Now.. first we must chat about Boyle's. If you have never been there, you must go. And lucky for you, they are open 8 days a week (if you haven't seen their TV commercial, just go with it.) There are so many things in that store I would love to get my painting hands on (including one particular claw foot tub- yikes!).  There is also a full-sized stuffed timber wolf there, but I am not in the market for any taxidermy at the moment.

This store is very overwhelming by the amount of things in it. I tend to be a little claustrophobic so I practiced deep breathing while I was there.. but then there is a weird smell.. so don't breath too deep.

Anyways... here are the 3 gems I found at the flea market:


First up: 


This awesome silver metal, antique looking, funky lamp base! I have been looking for a lamp base for this shade for probably a good 3 months now. I found the lamp shade on sale for I believe it was $5 at Lowe's and it has to have a knob to keep it in place. I thought, Easy! I can find a base for that anywhere! Wrong. Then I saw this beauty and voila! Mr. Boyle's wanted a whopping $6.95 for the base. Therefore, I have a very unique lamp for under $12! Here's another look:

LOVE.

Up next, this cute little shelf/wall piece:
That awesome ladder back there is going to be a quilt rack for the living room. 

This piece has a small shelf at the top, then two behind the glass, then those cute little cubbies on the bottom. This was an expensive $7.95. One of the frame pieces needs re-glued, but that's a piece of cake. This is going to go in my living room once I have painted it! Can't wait to show it too you all spiffy looking. Now... for the biggest purchase at Boyle's:


A DRESSER!!! Hallelujah the search is over!


It is currently this awesome shade of cobalt/purple. This color would be something I would have loved when I was 12 (I stamped electric colored flowers all over my wall at age 12- hippie child at heart here) but this just really won't fit in to the color scheme in my living room. Therefore, bring on the paint stripper and sander. I cannot wait for this to be finished and show you all how a $30 dresser can be an amazing piece of furniture with a little elbow grease (if all goes according to plan). Here's another angle:


Hope it fits in the living room!

I will post some "after" pictures once I get my behind in gear and get these guys done.

Have a happy day all!

Xo- Karalie 

Wednesday, December 4, 2013

Here Comes Santa Claus!

HAPPY HUMP DAY FRIENDS!


Only 2 days until the weekend- Whoo!

So now that Thanksgiving is officially behind us, we can bust out the Christmas tunes and eggnog. Except, we have been in the Christmas spirit since the middle of November and I don't like eggnog. But, the Gantz home is decorated and ready for Santa to slide down the chimney.


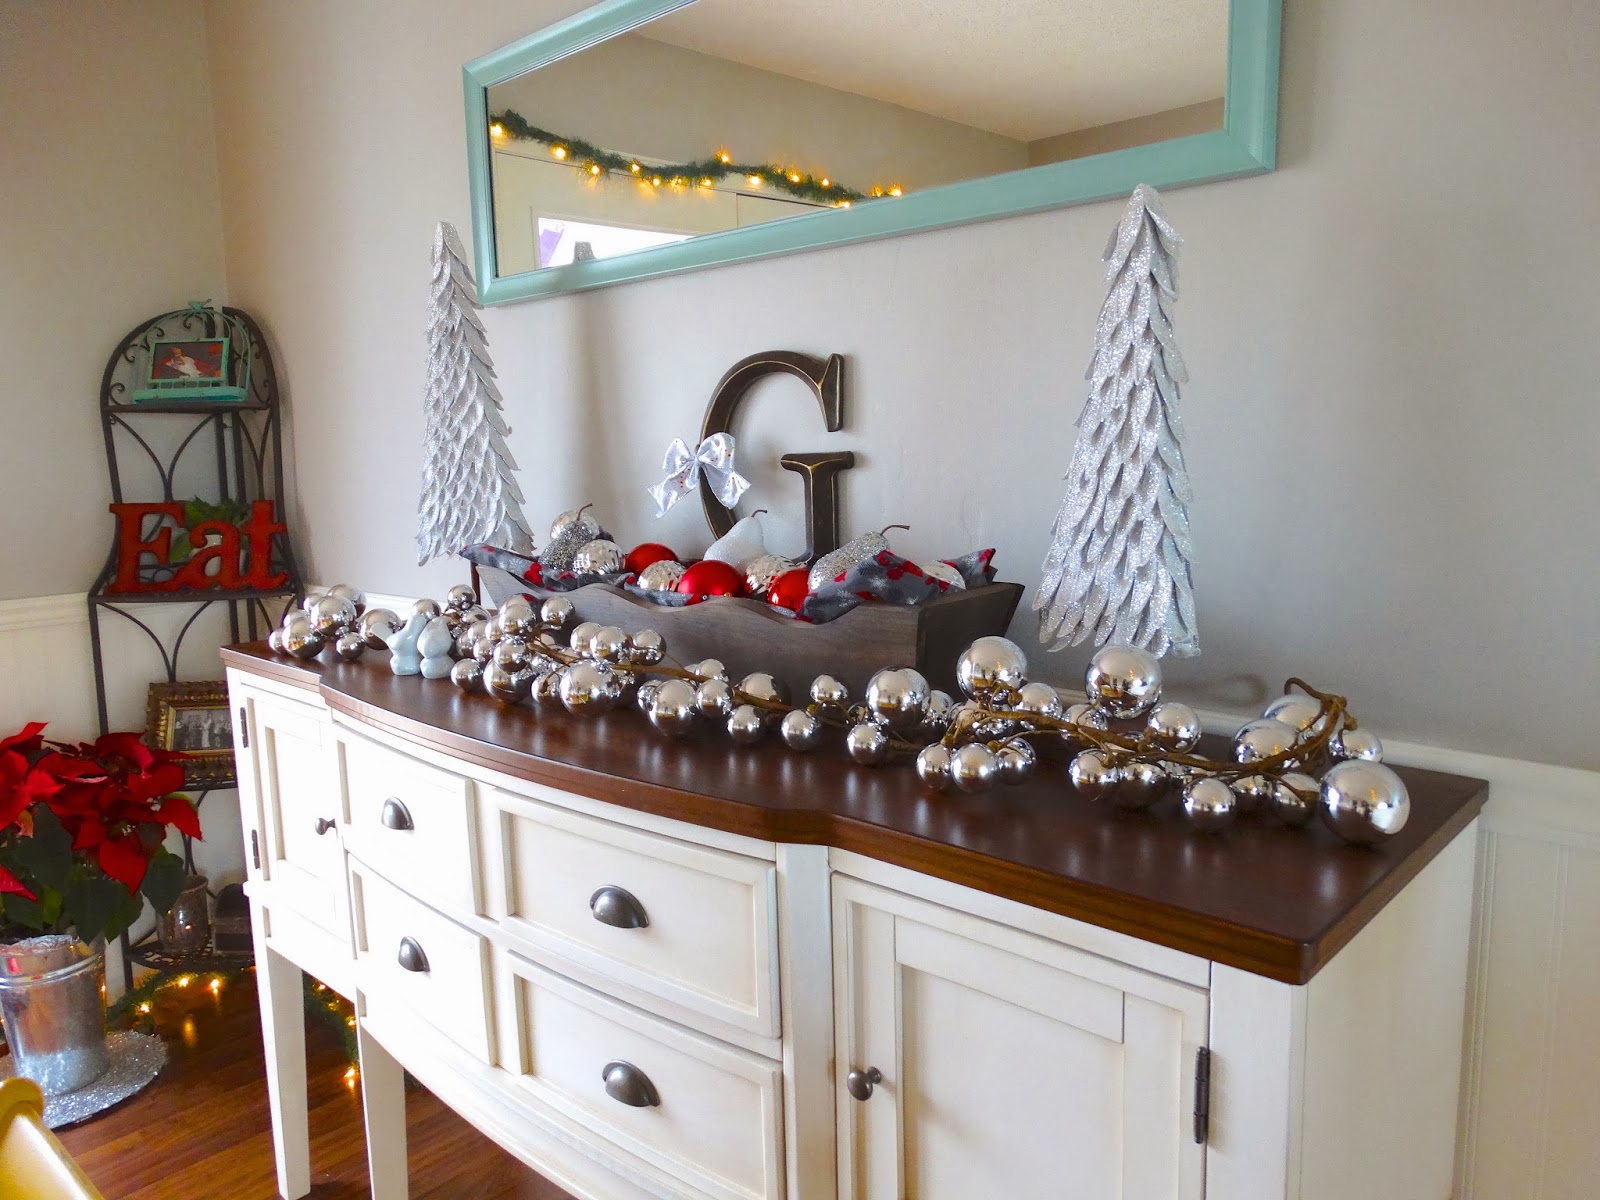
I went with a particular color scheme this year, silver and red, with touches of vintage and sparkle. Yes, I plan a color scheme each year, its that OCD thing coming out.


Let's start with the Christmas tree!


Those letters spell "Merry Christmas" and I got the inspiration at Pottery Barn. They were $3.50 a letter and I just couldn't see spending that on letters! Therefore, I bought the letters at JoAnn Fabric for $1.49, little left over silver paint and glitter spray and voila! My own letter banner.  You can semi-see one of the pillows we (well my mom) sewed for this season. One set is an awesome vintage Santa fabric and the other is fashioned after this pillow. Except, I did silver stars.

Up next, the buffet.


This is one of my favorite places to decorate in the main living area. The ornament garland I found at TJMaxx and the trees were half price at Hobby Lobby. The planter is left over from our wedding and I filled it with cute red bird and snowflake fabric. Layer in some ornaments and glitter pears to complete it! I love love this and can't wait to change the vibe each Christmas. Oh the possibilities!

Then let's move on to the dining room table.. Which is 100% complete!!


Yes I know our table is a little off center but just go with it. My wonderful mother sewed this adorable runner for me and it has vintage reindeer fabric in the middle. These white milk jugs I found at Target when we moved in and the berries I got half price at JoAnn. Add in some candles and hurricanes and we are complete! I am in the process of changing those yellow chairs to cream and will post them when I'm done.  (Look at that wood grain guys- success!)

Here are just a couple little projects I made...


These used to have some paper on them so I took a little acetone to them and dawn dish soap and they are as good as new. I painted stripes to go along with the color scheme for the year and filled with left over ornaments. I literally did not spend a dime on these and just used what I had!


These were wine bottles (obviously) that I gave a little makeover to. I free-handed the painting so the lines could be a little sharper but most definitely turned out better than I thought. Thanks mom for the cute bow!

Last, but not least, are just a few other things we did.


I found those stocking holders at TJMaxx for very little money and my mom made the stockings. I am eventually going to stencil a "G" and a "K" on them. The little wagon with the tree and snowman was once a baby blue. Black spray paint fixed that and now I can decorate throughout the seasons! Add a few Santa Claus' from Gabe's childhood and the Gantz home is open for the holidays!


Have you made some fun Christmas decor for the season? I'd love to hear what projects you guys are working on!


Up next in the Gantz life... Finish dining room chairs and.... start on... THE PALLET WALL! :)


Xo- Karl 

Friday, November 22, 2013

Table Update!

Happy Friday friends!!


I'd like to bring you a dining table update!


This post is about more sanding and removing paint, essentially getting the table ready for paint and stain. Here goes:


This is what the table looked like when I was finished sanding. We didn't sand all the paint off the legs and rails since we were going to re-paint those. The top has little flecks of the turquoise still left but I think it adds character. It is safe to say I never want to sand anything again ever, until the chairs are here. That's another blog post.

Once the sanding was up to par- we applied paint stripper onto the top of the table to get more of the turquoise off. Now, this stuff is nasty. It smells like a toxic orange dreamsicle and you have to wear gloves, but it is definitely worth it! Here is what we used:


Make sure you put it in a metal bucket! Then paint it on rather thickly and use a toothbrush to get down in the crevices. 


Follow the instructions on the particular stripping agent you are using, but we did not let ours dry too long because you don't want that gunk to be permanently stuck. Ew. 


Here is the second coat of stripper setting before we tooth-brush of it. Look at that wood grain! SCORE. 


This is what the table looks like after the final sanding and wood conditioner has been done. We are now ready to tape and paint! 


I went ahead at this point and tested the red color on the legs. Loved it, but it wasn't quite covering like I would have wanted it to. Therefore, PRIME! Piece of cake. 


We let this dry and then it was off to the races with the red paint! We applied light coats and let ample time for the paint to dry.  Here is what we came up with:


Ta-daaa!! I am officially obsessed with Valspar spray paint. We found this at Lowe's and its by far the best spray paint I have used (Mom agrees and she's the expert).  Remove the tape and voila:::


Time to stain and poly! I am really loving the way this turned out and can't wait to show you the finished product!

Have a fantastic weekend all! STAY WARM! 


Xo- Karl

Sunday, November 10, 2013

And the hunt is over...


I have officially found a dining room table to "redo." Gabe & I found this awesome piece at an antique store in North Lawrence on Locust St. Why we do not go down to these awesome shops more, I do not know, but if you have not been, I highly suggest to go! There were so many things I would have loved to have found places for in the house :)

But.. back the the table. So... here is how it looked when we bought it.


Granted... I love the color. But it just was not quite the color I was going for. But it was the exact shape. And yes, I know this is a very typical shape and I could probably walk into NFM and get one. But this one cost me a whopping $165, and its solid wood. And the stuff at NFM is so shiny. So shiny. 

So let the renovation begin!


First up... SANDING. I had to take a few pauses and wipe the thick layer of mermaid green dust off the table so I could see where to sand. It was intense. But seriously.. thank Jesus for the invention of the palm sander. Without it, this job would be terrible. 


As you can see, the wood grain is gorgeous and there are still little flecks of turquoise on the top. That is where the paint stripper will come in handy. But, here is what I have done so far---


Whoo! The whole table top is sanded and it took me about 2 full hours. 

Here is the list left to do on the table:
1) Finish removing paint.
2) Use paint stripper to remove any paint in the nooks and crannies.
3) Condition the top of the table with a wood conditioner.
4) Spray paint the legs and rail.
5) Stain the top.
6) Poly a few coats.
7) Enjoy my masterpiece.

Stay tuned for more updates!!

XO- Karl