Friday, November 22, 2013

Table Update!

Happy Friday friends!!


I'd like to bring you a dining table update!


This post is about more sanding and removing paint, essentially getting the table ready for paint and stain. Here goes:


This is what the table looked like when I was finished sanding. We didn't sand all the paint off the legs and rails since we were going to re-paint those. The top has little flecks of the turquoise still left but I think it adds character. It is safe to say I never want to sand anything again ever, until the chairs are here. That's another blog post.

Once the sanding was up to par- we applied paint stripper onto the top of the table to get more of the turquoise off. Now, this stuff is nasty. It smells like a toxic orange dreamsicle and you have to wear gloves, but it is definitely worth it! Here is what we used:


Make sure you put it in a metal bucket! Then paint it on rather thickly and use a toothbrush to get down in the crevices. 


Follow the instructions on the particular stripping agent you are using, but we did not let ours dry too long because you don't want that gunk to be permanently stuck. Ew. 


Here is the second coat of stripper setting before we tooth-brush of it. Look at that wood grain! SCORE. 


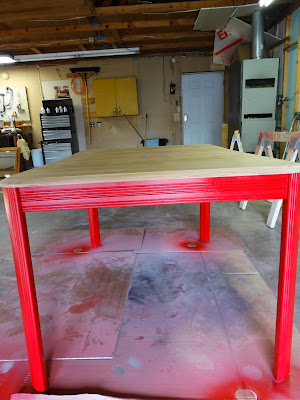
This is what the table looks like after the final sanding and wood conditioner has been done. We are now ready to tape and paint! 


I went ahead at this point and tested the red color on the legs. Loved it, but it wasn't quite covering like I would have wanted it to. Therefore, PRIME! Piece of cake. 


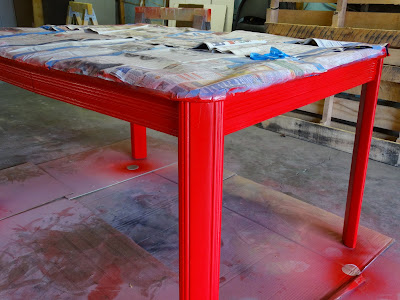
We let this dry and then it was off to the races with the red paint! We applied light coats and let ample time for the paint to dry.  Here is what we came up with:


Ta-daaa!! I am officially obsessed with Valspar spray paint. We found this at Lowe's and its by far the best spray paint I have used (Mom agrees and she's the expert).  Remove the tape and voila:::


Time to stain and poly! I am really loving the way this turned out and can't wait to show you the finished product!

Have a fantastic weekend all! STAY WARM! 


Xo- Karl

Sunday, November 10, 2013

And the hunt is over...


I have officially found a dining room table to "redo." Gabe & I found this awesome piece at an antique store in North Lawrence on Locust St. Why we do not go down to these awesome shops more, I do not know, but if you have not been, I highly suggest to go! There were so many things I would have loved to have found places for in the house :)

But.. back the the table. So... here is how it looked when we bought it.


Granted... I love the color. But it just was not quite the color I was going for. But it was the exact shape. And yes, I know this is a very typical shape and I could probably walk into NFM and get one. But this one cost me a whopping $165, and its solid wood. And the stuff at NFM is so shiny. So shiny. 

So let the renovation begin!


First up... SANDING. I had to take a few pauses and wipe the thick layer of mermaid green dust off the table so I could see where to sand. It was intense. But seriously.. thank Jesus for the invention of the palm sander. Without it, this job would be terrible. 


As you can see, the wood grain is gorgeous and there are still little flecks of turquoise on the top. That is where the paint stripper will come in handy. But, here is what I have done so far---


Whoo! The whole table top is sanded and it took me about 2 full hours. 

Here is the list left to do on the table:
1) Finish removing paint.
2) Use paint stripper to remove any paint in the nooks and crannies.
3) Condition the top of the table with a wood conditioner.
4) Spray paint the legs and rail.
5) Stain the top.
6) Poly a few coats.
7) Enjoy my masterpiece.

Stay tuned for more updates!!

XO- Karl